PyTorch is an open-source deep learning framework based in Python. PyTorch and TensorFlow are known to lead the forefront when it comes to implementing neural networks for deep learning. While TensorFlow has widely been adopted across many industries, PyTorch too is slowly picking up the pace. Companies like Apple, NVIDIA, Walmart etc. are known for implementing PyTorch into their technical stack.
PyTorch easily tops the list of go-to deep learning frameworks for beginners. It makes development of neural networks look like a piece of cake due to its high computational performance and easy learning curve. In this article, we shall learn about some key components and techniques you need to know about PyTorch in order to implement your very own neural network!
Table of Contents
Why PyTorch?
Some of the features that PyTorch the best framework for implementing neural networks are:
Simplicity: Python has a very user-friendly syntax and PyTorch also blends easily with other readily available Python libraries. Even debugging errors and developing layers becomes easy with PyTorch.
Comprehensive API: PyTorch shines in terms of usability due to optimally designed Object-Oriented functions. The documentation of PyTorch is also very resourceful and helpful for beginners.
Debugging: Pytorch allows for easy debugging of errors using Python’s pdb and ipdb toolset.
Installation
The Get Started page on the PyTorch website makes downloading and installing the framework a breeze. All you need to know is your computer specifications and the page will deliver the command you need to use to download the PyTorch library.

To check whether PyTorch has successfully been installed simply import the library.
import torch
Components of PyTorch
Now let’s move on to some basic features of the framework that are vital for making the best use of PyTorch.
Tensors
Using PyTorch is said to be as easy as using NumPy! But the NumPy package cannot make use of GPUs for complex computations and struggles with large numerical calculations that are normally associated with deep learning. PyTorch implements something called tensors that basically work like NumPy arrays.
Tensors are n-dimensional arrays. They are used to develop computational graphs and gradients. Unlike NumPy arrays, tensors can make use of GPUs in order to accelerate their operations. A number of operations and functions are written in the torch package to manipulate and make the most of tensors.
We use the torch.tensor() command to create tensors. It can be a vector, number, matrix or a multi-dimensional array.
# Creating 3 dimensional tensor with integer values
t = torch.tensor([[[1, 2, 3, 4],[11, 12, 13, 14]],[[1, 2, 3, 4],[6, 7, 8, 9]]])
Tensors can also be created using –
| Function | Definition |
| torch.zeros(m,n) | Creates a tensor of 0s of m x n dimension |
| torch.ones(m,n) | Creates a tensor of 1s of m x n dimension |
| torch.rand(m,n) | Creates a tensor containing random numbers |
| torch.randn(m,n) | Creates a tensor containing random positive numbers |
| torch.from_numpy() / torch.numpy() | Convert numpy array to tensor and vice versa |
Some functions that can be used to manipulate and find out more about the tensor –
torch.dtype () – Used to find the datatype of tensor. This can also be set while making a tensor. Tensor supports 9 different datatypes including FloatTensor – 32 bit float, DoubleTensor – 64 bit float etc.
torch.Size() – To find the size of tensor.
torch.device() – To find or set the physical memory of the tensor. It can be set to ‘cpu’, ‘cuda’ etc.
Following are some of the operations that can be performed on tensors –

Autograd
Autograd is a module in PyTorch that implements a technique called automatic differentiation. Instead of having to manually implement forward or backward propagation while developing a neural network, autograd package does the work for us. It calculates gradients automatically. It is implemented by including the requires_grad parameter while initializing a tensor.
We know that each tensor is simply a node in a computational graph.
a = torch.randn((), requires_grad=True)
After the gradient is calculated, the weight and bias is automatically stored in grad attribute of the tensor. If a is a tensor that had required_grad set as true, then a.grad is a tensor created to hold the gradient of a.
Optimizers
Optimizers are used to store and update weights and biases. PyTorch uses torch.optim package to transform internal parameters of the model.
import torch.optim as optim
params = torch.tensor([1.0, 0.0], requires_grad=True)learning_rate = 1e-3

## Adam
optimizer = optim.Adam([params], lr=learning_rate)
The optim package helps to initialize the model without having to periodically pass a list of parameters. Just choose one optimization scheme (RMSprop, Adagrad, Adam, SGD etc.) and PyTorch will do the rest!
Neural Network
In PyTorch, the torch.nn module is used to implement neural networks. It contains a set of attributes called Modules that takes the input from the previous state and produces an output. The package also contains a set of loss functions that are required to optimally train and test a model.
Requirements to build a neural network –
- Construct neural network module with weights and biases.
model = torch.nn.Sequential(
torch.nn.Linear(3, 1),
torch.nn.Flatten(0, 1) )
Sequential is a kind of Module that contains other modules. The Linear module computes the output using a linear function on the input. The Flatten module here converts the linear output to a 1D layer. You can also find the weights and biases using model.weight and model.bias.
- Calculate predicted output at each step and compute the error i.e forward propagation.
- If error is huge, we backward propagate to update weight parameters.
- We use optimizers as specified above to minimize error in gradient descent.
We will understand the above steps by creating a neural network of our own!
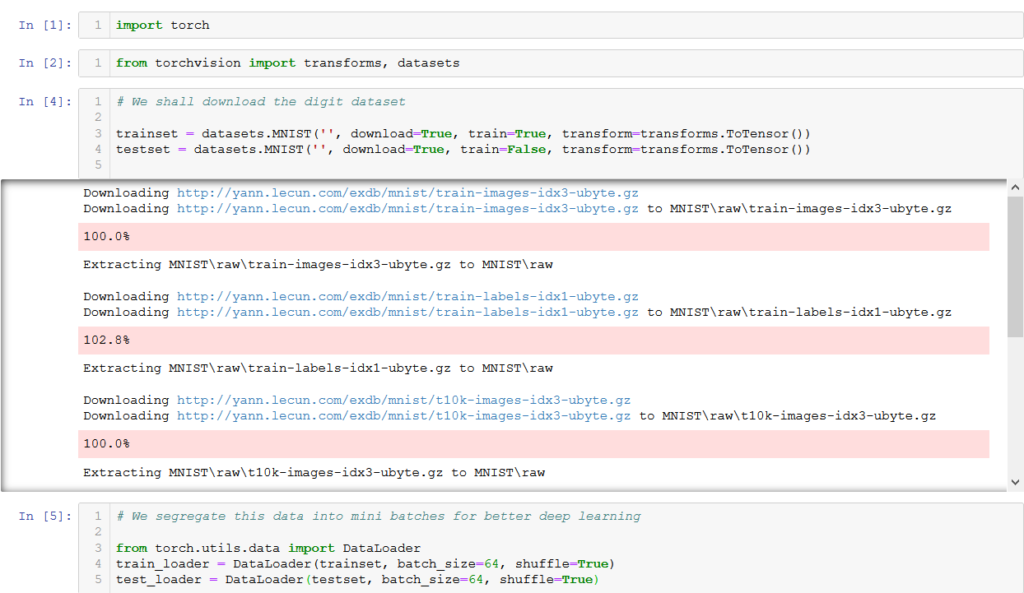
First we import the necessary libraries and dataset. Here we use the digits dataset from the MNIST repository.

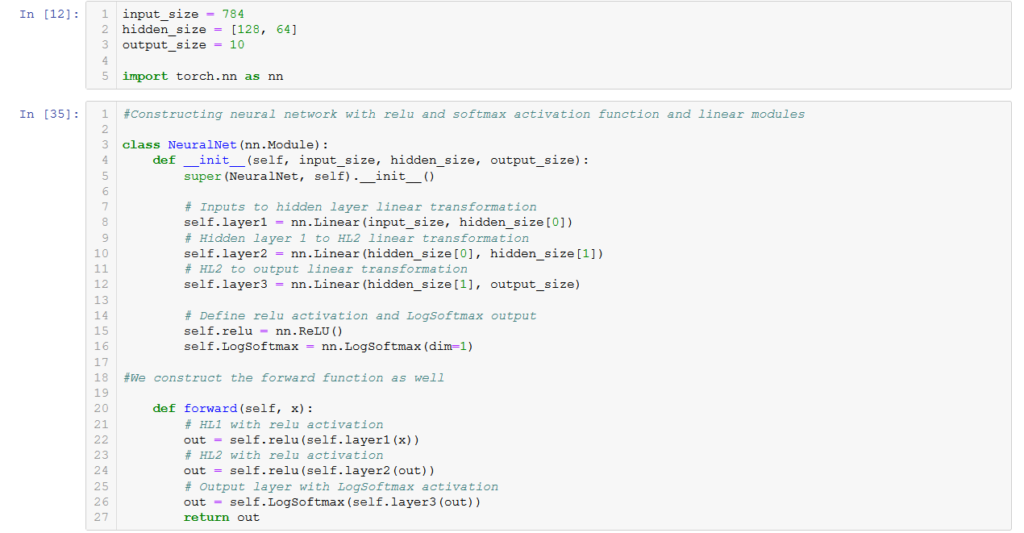
Then we import nn library and construct our neural network by defining modules and forward propagation function. In the init function we configure all layers (here, linear) and parameters, and then we define the forward function to compute the output by applying the layers and corresponding activation functions. We use the ReLu activation on the first two layers that works linearly to give positive values. The LogSoftMax gives a log operation to the final output layer.

Then we run the model and define the optimizer function. This is needed to choose the best optimization scheme (we have used Adam) and reduce loss.

We run the model using 10 epochs. An epoch is simply the number of times we run the training model. We compute the training loss at each step.

Finally we test how our neural network works on the test data.

Summary
This article sums up all the basics you need to know to get started on your journey in deep learning using PyTorch. We have also built a neural network from scratch using the torch library in Python. Hope you liked this tutorial on one of the best deep learning frameworks!


